To provide some autonomy to the SCCM software update point role cross forest, use the following steps to stand up additional WSUS / SUP instances. This is something I've had set up in my lab for a couple of years and has been working well. It's also something I've used in production SCCM installations.


Requirements:
- SQL Server instance to host SUSDB.
- At least a one way trust into the forest the SCCM Primary Site Server and SQL Server reside.
- Your user account needs SA on SQL instance and full control on WSUSContent shared directory.
- Firewall rules to allow SMB traffic to location of shared content
- Firewall rules to allow SQL ttraffic from Site Systems to SQL DB Server.
- Primary Site server or site installation account needs local admin on each Site System to install SUP role.
Design:

For this example I'll have the following systems:
- LAB-SCCM-01.domain1.local : Primary Site Server and SQL Database Server
- LAB-SCCM-SUP-01.domain1.local : Site System with SUP & MP role
- LAB-SCCM-SUP-02.domain3.local : Site System with SUP & MP role
WSUS content will be stored in the "\\LAB-SCCM-01.domain1.local\Updates" share.
High Level Steps:
- Create AD security group "SCCM_Site_Systems" containing SUP-01 and SUP-02
- Create cross forest WSUS Connection account for access from the site to WSUS.
- Create "Updates" share in central location for shared WSUSContent (in this case on SCCM-01)
- Grant "SCCM_Site_Systems" full control to share and NTFS
- Install WSUS on SUP-01 and SUP-02
- Install WSUS admin console on Primary Site Server (SCCM-01)
- Stop WSUS and run wsusutil postinstall command on each SUP.
- Configure IIS
- Install SUP roles
Step by Step:
1. Create AD security group
a. Using Active Directory Users and Computers in DOMAIN1, create a new security group called SCCM_Site _Systems or similar.
b. Add each SCCM Site System by enabling the computer object type and change the forest for each location you need to add from.

2. Create cross forest WSUS connection account.
This account is used by SCCM to connect to WSUS, it needs to be a member of the 'WSUS Administrators' account on the SUP.

3. Create "Updates" share in central location
I've used a folder on the E: drive of the primary site server as the content location and created a share called 'Updates'. In a production environment you wouldn't want this on the primary site server unless the drive configuration and capacity allowed it.
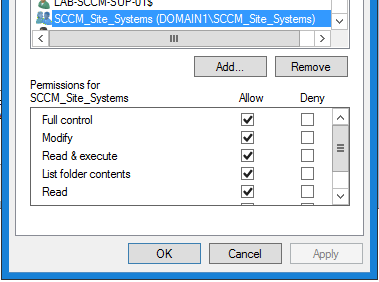
4. Grant "SCCM_Site_Systems" full control to share and NTFS
In order for WSUS to control the WSUSContent share, each site system will need full control of the share and have the relevant NTFS permissions.
In addition to this, a user account from each domain needs to have read / execute permissions to the directory and share (this is for the IIS content physical path credentials).
In addition to this, a user account from each domain needs to have read / execute permissions to the directory and share (this is for the IIS content physical path credentials).

5. Install WSUS on Site Systems
Using PowerShell command.
Install-WindowsFeature Net-Framework-Features, RDC, UpdateServices-Services,UpdateServices-UI, UpdateServices-DB -Restart
6. Install WSUS admin console on Primary Site Server
The admin console is required so that the primary site server can manage the SUP's. Use the following PowerShell command:
Install-WindowsFeature -Name UpdateServices-RSAT
7. Run wsusutil postinstall.
To configure each WSUS instance to point to the shared DB and content directory use the wsusutil.exe postinstall command below on each Site System, make sure you stop WSUS on any servers already pointed at the SQL SUSDB to prevent issues with single user mode.
Stop-Website "WSUS Administration"
Stop-Service WsusService -Force
Using the wsusutil.exe in "c:\program files\update services\tools"
Run the following command:
wsusutil.exe postinstall SQL_INSTANCE_NAME={SQLINSTANCE} CONTENT_DIR={FQDN-UNC}
In my case:
SQLINSTANCE: LAB-SCCM-01.domain1.local
CONTENT_DIR: \\LAB-SCCM-01.domain1.local\updates
8. Configure IIS
Some extra configuration is needed to optimize IIS.
a: WSUS app pool and queue length (for performance gains)
- On each IIS instance, Expand your server and choose Application Pools.
- Right-click the WsusPool and choose Advanced Settings.
- Find the Recycling section near the bottom. Change Private Memory Limit (KB) to a higher number that fits your server specifications or ‘0’, which means no limit, instead of the hard-coded 1843200.
- Then change the value of ‘Queue Length’ under the General section from the default 1,000 to 30,000
- Hit OK, and run IISRESET
b. Content virtual directory permissions. (for cross forest content downloads)
- On each IIS instance, Expand your server and choose WSUS Administration site
- Click on 'Content' and select 'Advanced Settings'
- Enter the user account created in step 4 which has read access to the content share in the 'Physical Path Credentials'
9. Install Software Update Point.
Using the SCCM console, install the SUP roles on each of the site systems.
This is a great document for reference:
https://docs.microsoft.com/en-us/sccm/sum/get-started/install-a-software-update-point