Showing posts with label Configuration Manager. Show all posts

Provision and Build Windows VM's in a Hyper-V Lab Environment Using PowerShell and ConfigMgr

Background

I needed a way to efficiently provision and build Windows 10 systems in my Hyper-V lab environment which followed a naming convention. The obvious way forward was to create a series of PowerShell scripts. This post is to serve as an example of how to achieve this in a lab, in no way is this production ready.

Firstly a script is executed on the Hyper-V host to provision a new virtual machine with predefined settings for RAM, CPU etc plus it is set to boot from network. To ensure each VM has a unique hostname it is derived from today's date plus a portion of the network adapters MAC address.

My ConfigMgr environment has PXE enabled DP's with unknown computer support, so once the VM is booted it will load WinPE and I'll be presented with the list of available task sequences. During the task sequences another PowerShell script is run to populate the OSDComputerName TS variable with the same name as the VM. This is determined based on the same logic as the previous script (using today's date + MAC).

Hyper-V Provisioning

This script uses the Hyper-V cmdlets to set up a new VM, it's booted initially (start-vm) to generate the network adapter MAC address. This will need populating with your environment specific settings.

#retrieive today's date
$date = get-date -Format ddMM
#create prefix for Win10 systems
$prename = "W10-$date" 

New-VM -Name $prename -MemoryStartupBytes 4GB -BootDevice NetworkAdapter -SwitchName 'Location 2'  -Path K:\ConfigFiles -Generation 2
Start-VM $prename
Stop-VM $prename -TurnOff
$mac = Get-VMNetworkAdapter $prename
$mac = $mac.MacAddress
$mac = $mac.Substring($mac.get_Length() -4)
$name = "$prename-$mac"
Rename-VM -Name $prename -NewName $name
$path = New-VHD -Path K:\vhd\$name.vhdx -Dynamic -SizeBytes 40GB

Add-VMHardDiskDrive -ControllerType SCSI -VMName $name -Path $path.path
Set-VMProcessor $name -Count 2

ConfigMgr OSDComputerName

This script is run before the 'Apply Windows Settings' task sequence step in any TS that I'll be running. I've used the 'IsVM' variable to prevent this from executing on hardware (The serial number is used for hardware builds).

$tsenv = New-Object -ComObject Microsoft.SMS.TSEnvironment 
$TSComputerName = $tsenv.value("OSDComputerName") 

$date = get-date -Format ddMM
$prename = "W10-$date" 

$mac= Get-WMIObject Win32_NetworkAdapter -filter "AdapterType Like '%ethernet%'" | Select MacAddress
$mac = $mac.MacAddress
$mac = $mac -replace ':',''
$mac = $mac.Substring($mac.get_Length() -4)
$name = "$prename-$mac"
$TSComputerName = $name 
$tsenv.value("OSDComputerName") = $TSComputerName


Promote Passive SCCM Site Server to Active

If you've followed my previous post about implementing SCCM site server high availability in a lab, this is a quick guide to demonstrate how to promote a passive mode site server to active mode.

  • In the SCCM console, navigate to Administration > Site Configuration > Sites
  • Select site and switch to the Nodes tab

  • Right Click the passive site server, click Promote to active, and Yes

  • Refresh the console to view the current status.

  • For more details, open Monitoring > Overview > Site Server Status and right click to Show Status


Install SCCM 1806 with HA Site Servers in a lab

I wanted to install a fresh SCCM environment in my lab to play around with the new funky features in SCCM 1806. What better excuse to start from scratch and create a new blog post!

This guide will walk you through installing a fresh SCCM 1806 environment and demonstrate the site server active/passive functionality. As you can see from the design below, only the SCCM site servers are highly available. In a production environment you'd host the site database on a SQL cluster or AOAG, and have multiple site systems hosting the SCCM client facing roles (MP, DP, SUP etc). This guide will not cover installing the SQL server. 


Prerequisites and Requirements

  • Configure a separate SQL Instance (HA in production).
  • Create a network location for site content library, read/write granted to site servers.
  • Both site servers need to be on same domain.
  • SCCM needs to be a standalone site.
  • Both servers must use the same remote database.
  • Both servers need sysadmin permissions on the site database SQL instance.
  • Both servers must be local admin on each other.
  • Both servers much be local admin on SQL server hosting site database.


Step-by-Step

1. Create SCCM user accounts

These accounts won't be used in this guide but are some of the standard accounts I use in a lab.

svc_cm_admin - default SCCM administrator account
svc_cm_djoin - domain join account
svc_cm_naa - network access account
svc_cm_push - client push account

2. Extend Active Directory schema


Run the extadsch.exe on a domain controller. extadsch.exe is provided on the SCCM installation media in: /SMSSETUP/BIN/X64

3. Create System Management container

  • Log on as an account that has the Create All Child Objects permission on the System container in Active Directory Domain Services.
  • Run ADSI Edit, and connect to the domain in which the site server resides.
  • Expand Domain <computer fully qualified domain name>, expand <distinguished name>, right-click CN=System, click New, and then click Object.

  • In the Create Object dialog box, select Container, and then click Next.

  • In the Value box, type System Management, and then click Next.

  • Click Finish.
  • Grant the computer account of each SCCM site system full control over the container and all descendant objects.

4. Install all prerequisites on each of the servers. 

Use the ConfigMgr Prerequisite tool to install all the required server roles applicable to each server.


 5. Install the Windows ADK on each site server.

  • Download and install the Windows 10 ADK from:

  • Select the following features:

6. Install SCCM on the active site server.

  • Initiate the installation of SCCM on the active site server (LAB-CMSS-01)

  • Enter product key
  • Download installation prerequisite content

  • Configure site settings


  • Do not install DP or MP roles at this stage


  • Once complete, configure discovery methods (forest discovery with boundary creation at a minimum) and then create a boundary group for your domain.

 7. Manage content library

The content library needs to be moved to a resilient file server in order to enable site server high availability. 
  • Within the SCCM console Administration > Site Configuration > Sites
  • Select the site and click Manage Content Library in the ribbon bar.
  • Enter the UNC path to the network share to host the content library
    • Monitor the distmgr.log for errors.
    • The new location needs to be a directory within a share
    • If the move fails initially, use the ConfigMgr service manager to restart the SMS_DISTRIBUTION_MANAGER component once you've resolved errors.


8. Install the passive site server.

Let's initiate the installation of the passive site server on LAB-CMSS-02. 

  • In the SCCM console Administration > Site Configuration > Sites
  • Click Create Site System Server
  • Enter the FQDN of the passive server and select the site.

  • Select the role Site Server in passive mode

  • Enter the path to source files, it's recommended to use the cd.latest folder in the site share.
  • Enter the installation folder on the destination server.


  • Monitor the installation progress in Monitoring > Site Server Status
    • Click Show Status for more detail.


9. Install additional SMS Provider

By default, only the original site server has the SMS Provider role. If this server is offline, you can't connect to the site as no provider is available. When you add the site server in passive mode, the SMS Provider isn't automatically added. Add at least one additional SMS Provider role to your site for a highly available service.
I'll install the SMS Provider role on the passive site server  (LAB-CMSS-02)

  • On the active site server, load the SCCM setup wizard from media, or click Uninstall/Change when selecting SCCM in Control Panel > Program and Features
  • Select Perform Site Maintenance or Reset This Site


  • Choose Modify SMS Provider Configuration

  • Choose Add a new SMS Provider and enter the FQDN of the passive site server.
  • Complete setup wizard.


10. Install site system

This final step installs the management point and distribution point roles on the separate site system. In a production environment it's recommended to have additional site systems for resiliency. 

  • Navigate to Administration > Site Configuration > Servers and Site System Roles
  • Click Create Site System Server
  • Enter FQDN of site system and select site in drop down box

  • Select Management Point and Distribution Point roles
  • Complete the rest of the wizard with settings to meet your requirements.

Test site server promotion

To test your new site server high availability, see this short blog post:


SCCM - WSUS MasterFrontEndServer Shared Database

I came across an issue recently where one of the SUP's in our SCCM environment failed to synchronize with Microsoft due to network issues.

I assumed the SUP being used for synchronization was the server shown with 'Microsoft Update' as the synchronization source. However, it turns out this wasn't the case. I had to view a record in the SUSDB to determine which system was actually synchronizing with MS.

To view the NLBMasterFrontEndServer, run the following SQL query on the SUSDB.

SELECT NLBMasterFrontEndServer
  FROM [SUSDB].[dbo].[tbReference]


SCCM Windows Update Compliance Reports Using Latest SUG

I've recently been working on some Window update compliance reports which dynamically retrieve compliance data for the latest SUG (Software Update Group) created on Patch Tuesday. This makes it easy for administrators and management to keep track of compliance without the need to find and select the latest SUG.

The SUG is deployed to two collections on the evening of patch Tuesday, one containing servers and the other workstations. We have a multi-tenant environment so the report splits these systems up by customer.

The compliance data is presented using pie charts on an SSRS report. I'll update this post at a later date with how I formatted these, for now I'll just provide the SQL we use to report on our server estate.


Prerequisites:

- Make sure your ADR is configured to create a new SUG each time it's triggered.
- Our ADR triggers on patch Tuesday (2nd Tuesday of the month).
- Create a separate database (Mine is called 'CM_Runtime') to store SQL functions. I wasn't too keen on defining functions on the CM database.

Create Functions:

To scope the report to a SUG created on the most recent patch Tuesday, we need to save some stored procedures ('PCC_SEC_TUESDAY'  and  'PCC_LAST_SEC_TUESDAY') in a runtime database which calculate the most recent patch Tuesday date based on the date the report is run using the following query:  SELECT [dbo].[PCC_LAST_SEC_TUESDAY](getdate())

Run the SQL statements below on the database created in prerequisite steps.

PCC_SEC_TUESDAY returns the 2nd Tuesday of the month that any date is in (@date would be the parameter.
================================================

CREATE FUNCTION PCC_SEC_TUESDAY
(
@p_date datetime
)
RETURNS DATETIME
AS
BEGIN
DECLARE @firstday AS DATETIME;
DECLARE @lastDay  AS DATETIME;
DECLARE @sectue   AS DATETIME;
--
DECLARE @today AS DATETIME -- for testing
SET @today = @p_date;


SET @firstday = DATEADD(MONTH, DATEDIFF(MONTH, 0, @today), 0)
SET @lastday = DATEADD(DAY, -1, DATEADD(MONTH, 1, @firstday));


--SELECT @today AS [Today], @firstday AS FirstDayOfMonth, @lastday AS LastDayOfMonth

WITH MyDates AS
(
    SELECT @firstday AS MyDate, DATENAME(DW, @firstday) AS NameOfDay
    UNION ALL
    SELECT DATEADD(DAY, 1, MyDate) AS MyDate, DATENAME(DW, DATEADD(DAY, 1, MyDate)) AS NameOfDay
    FROM MyDates
    WHERE DATEADD(DAY, 1, MyDate)<@lastDay
)
SELECT @sectue = Mydate 
FROM (
    SELECT ROW_NUMBER() OVER(PARTITION BY NameOfDay ORDER BY MyDate) AS RowNo, *
    FROM MyDates
    ) AS T
WHERE (RowNo=2 ) AND NameOfDay = 'Tuesday';
    RETURN @sectue;
END

================================================
PCC_LAST_SEC_TUESDAY
a) Works out the 2nd Tuesday of the month for the current date
b) If this is before or after the current date then return the 2nd Tuesday of the previous month
================================================

CREATE FUNCTION PCC_LAST_SEC_TUESDAY
(
@p_date datetime
)
RETURNS DATETIME
BEGIN
   DECLARE @lastsectue DATETIME;
   -- Get the 2nd Tuesday for the month of the date given
   DECLARE @thissectue DATETIME;
   SET @thissectue = dbo.PCC_SEC_TUESDAY(@p_date);
   -- is this date after the imput date
   IF @thissectue <= @p_date
   BEGIN
      SET @lastsectue = @thissectue;
   END;
   ELSE
   BEGIN
      -- previous months 
  DECLARE @monthago DATETIME
  SET @monthago = DATEADD(MONTH, -1, @p_date);
  SET @lastsectue = dbo.PCC_SEC_TUESDAY(@monthago);
END;
--
RETURN @lastsectue;
END;


Report SQL Query

The query to use in the SSRS report is below, the following strings will need editing to reflect your SCCM set up.

Customer A Device Collection ,'Customer B Device Collection'. - Used to split servers up by customer.
Server Software Updates  -- Name of the SUG deployment.
SUM | Server Software Updates - Name of collection the SUG is deployed to.
ADR | Server Software Updates - Name of the ADR used to create the SUG deployment.


declare  @collname  table(name  varchar(100));
declare  @title varchar(max);
declare @collid  table(id  varchar(100));
declare  @assignmentid table(id  varchar(100));
insert into @collname   values( 'Customer A Device Collection'),('Customer B Device Collection')
insert into @assignmentid   SELECT AssignmentID FROM v_CIAssignment WHERE 
CreationTime >= SELECT [CM_Runtime].[dbo].[PCC_LAST_SEC_TUESDAY](getdate()) 
and
CollectionName like 'SUM | Server Software Updates%' 
and
AssignmentName like '%Server Software Updates%' 
insert into @collid SELECT CollectionID from dbo.v_Collection where name in (select name from @collname)    -- Get Collection ID's from Collection names -- 
set @title = (SELECT Title
  FROM v_AuthListInfo WHERE 
  CI_UniqueID = (SELECT TOP 1 CI_UniqueID FROM v_AuthListInfo WHERE Title like 'ADR | Server Software Updates%' ORDER BY DateCreated DESC));
SELECT
@title AS SUG,
Count(StateID) AS Total,
Count(CASE When StateID = '1' OR StateID = '4' THEN 'OK' END) AS OK,
Count(CASE When StateID = '0' THEN 'Unknown' END) AS Unknown,
Count(CASE When StateID = 5 or StateID = 7 or StateID = 8 or StateID = 10 THEN 'Warning' END) AS Warning,
Count(CASE When StateID = 2 or StateID = 6 or StateID = 9 THEn 'Critical' END) AS Critical,
(SELECT name from dbo.v_Collection where CollectionID = v_fullcollectionmembership.collectionID) AS Collection
                FROM v_AssignmentState_Combined
INNER JOIN
v_R_System ON v_AssignmentState_Combined.ResourceID = v_R_System.ResourceID INNER JOIN
v_fullCollectionMembership on v_R_System.ResourceID = V_FullCollectionMembership.ResourceID
                WHERE 
v_R_System.ResourceID = v_AssignmentState_Combined.ResourceID AND
v_AssignmentState_Combined.AssignmentID in (SELECT id from @assignmentid)
AND
v_fullcollectionmembership.collectionID in (select id from @collid)
GROUP BY v_fullcollectionmembership.collectionID


Move WSUS content when running multiple SCCM SUPs, shared content and database

Recently I needed to relocated the WSUS content directory for an SCCM site which was running multiple Software Update Points with a shared content directory and SUSDB cross forest. It was pretty straight forward, but it needed a methodical approach to be successful.

High Level Steps:

1. Create a new directory and share.
2. Grant the appropriate permissions.
3. Stop WSUS on cross forest SUPs (all but one).
4. Run Wsusutil MoveContent command.
5. Alter registry and IIS on cross forest SUPs.
6. Start WSUS instances.

Detailed Steps:


1. Create Directory and Share

Create a directory and share for WSUS content, this could be on a file server or local. But it needs to be accessible by all SUPs over SMB using a UNC path. It should mimic the current content location in terms of permissions and network access.

2. Grant Permissions

SUP's will connect to the share using the computer accounts, so at least a one way inbound trust needs to exist beforehand. Grant the computer accounts for all SUPs 'Full Control' for the share and for NTFS.

The user account being used to run the wsusutil movecontent command will also need full control.

3. Stop WSUS on SUPs.

Stop the WSUS service and website on all SUP's except the SUP currently being used to synchronize with Microsoft Update (the WSUS master front end server).

Stop-Website "WSUS Administration"
Stop-Service WsusService -Force

4. Run WSUSUtil MoveContent command

On the currently active SUP, open an elevated command prompt and run the following command from c:\program files\update services\tools

Wsusutil.exe movecontent \\FQDN\SHARE\ c:\dir\wsuslog.log

This will move the content from the current directory to the share on server \\FQDN and output a log file to c:\dir\wsuslog.log. It's obvious, but make sure you use the fully qualified domain name and it's resolvable cross forest.

5. Alter registry and IIS on other SUPs

You could run the wsusutil moveconten command on each of the other SUPs with the -skipcopy flag. But I find it just as easy to alter the registry and IIS.

Update the 'contentdir' string in HKEY_LOCAL_MACHINE\SOFTWARE\Microsoft\Update Services\Server\Setup\  to reflect the share path  (i.e. \\FQDN\SHARE\ )

Open IIS, expand WSUS Administration, click on 'content' and select 'advanced settings'
Enter the full path to the wsuscontent folder on the share. i.e. \\FQDN\SHARE\wsuscontent\

6. Start WSUS on all instances

Once the registry entries and IIS has been updated, start the WSUS service and websites on all sups.

Start-Website "WSUS Administration"
Start-Service WsusService

SCCM - Cross Forest Software Update Points (SUP's)

To provide some autonomy to the SCCM software update point role cross forest, use the following steps to stand up additional WSUS / SUP instances. This is something I've had set up in my lab for a couple of years and has been working well. It's also something I've used in production SCCM installations.

Requirements:


  • SQL Server instance to host SUSDB.
  • At least a one way trust into the forest the SCCM Primary Site Server and SQL Server reside.
  • Your user account needs SA on SQL instance and full control on WSUSContent shared directory.
  • Firewall rules to allow SMB traffic to location of shared content
  • Firewall rules to allow SQL ttraffic from Site Systems to SQL DB Server.
  • Primary Site server or site installation account needs local admin on each Site System to install SUP role.

Design:


For this example I'll have the following systems:
  • LAB-SCCM-01.domain1.local : Primary Site Server and SQL Database Server
  • LAB-SCCM-SUP-01.domain1.local : Site System with SUP & MP role
  • LAB-SCCM-SUP-02.domain3.local : Site System with SUP & MP role
WSUS content will be stored in the "\\LAB-SCCM-01.domain1.local\Updates" share.

High Level Steps:

  1. Create AD security group "SCCM_Site_Systems" containing SUP-01 and SUP-02
  2. Create cross forest WSUS Connection account for access from the site to WSUS.
  3. Create "Updates" share in central location for shared WSUSContent (in this case on SCCM-01)
  4. Grant "SCCM_Site_Systems" full control to share and NTFS
  5. Install WSUS on SUP-01 and SUP-02
  6. Install WSUS admin console on Primary Site Server (SCCM-01)
  7. Stop WSUS and run wsusutil postinstall command on each SUP.
  8. Configure IIS
  9. Install SUP roles

Step by Step:

1. Create AD security group

a. Using Active Directory Users and Computers in DOMAIN1, create a new security group called SCCM_Site _Systems or similar.

b. Add each SCCM Site System by enabling the computer object type and change the forest for each location you need to add from.


2. Create cross forest WSUS connection account.

This account is used by SCCM to connect to WSUS, it needs to be a member of the 'WSUS Administrators' account on the SUP.


3. Create "Updates" share in central location

I've used a folder on the E: drive of the primary site server as the content location and created a share called 'Updates'. In a production environment you wouldn't want this on the primary site server unless the drive configuration and capacity allowed it.


4. Grant "SCCM_Site_Systems" full control to share and NTFS

In order for WSUS to control the WSUSContent share, each site system will need full control of the share and have the relevant NTFS permissions.
In addition to this, a user account from each domain needs to have read / execute permissions to the directory and share (this is for the IIS content physical path credentials).


5. Install WSUS on Site Systems

Using PowerShell command.

Install-WindowsFeature Net-Framework-Features, RDC, UpdateServices-Services,UpdateServices-UI, UpdateServices-DB -Restart


6. Install WSUS admin console on Primary Site Server

The admin console is required so that the primary site server can manage the SUP's. Use the following PowerShell command:

 Install-WindowsFeature -Name UpdateServices-RSAT


7. Run wsusutil postinstall.


To configure each WSUS instance to point to the shared DB and content directory use the wsusutil.exe postinstall command below on each Site System, make sure you stop WSUS on any servers already pointed at the SQL SUSDB to prevent issues with single user mode.


Stop-Website "WSUS Administration"

Stop-Service WsusService -Force


Using the wsusutil.exe in "c:\program files\update services\tools"

Run the following command:

wsusutil.exe postinstall SQL_INSTANCE_NAME={SQLINSTANCE} CONTENT_DIR={FQDN-UNC}

In my case:
SQLINSTANCE: LAB-SCCM-01.domain1.local
CONTENT_DIR: \\LAB-SCCM-01.domain1.local\updates

8. Configure IIS

Some extra configuration is needed to optimize IIS. 

a: WSUS app pool and  queue length (for performance gains)
- On each IIS instance, Expand your server and choose Application Pools.
- Right-click the WsusPool and choose Advanced Settings.
- Find the Recycling section near the bottom. Change Private Memory Limit (KB) to a higher number that fits your server specifications or ‘0’, which means no limit, instead of the hard-coded 1843200.
- Then change the value of ‘Queue Length’ under the General section from the default 1,000 to 30,000
- Hit OK, and run IISRESET

b. Content virtual directory permissions. (for cross forest content downloads)
- On each IIS instance, Expand your server and choose WSUS Administration site
- Click on 'Content' and select 'Advanced Settings'
- Enter the user account created in step 4 which has read access to the content share in the 'Physical Path Credentials'


9. Install Software Update Point.

Using the SCCM console, install the SUP roles on each of the site systems. 

This is a great document for reference:
https://docs.microsoft.com/en-us/sccm/sum/get-started/install-a-software-update-point


Dynamic SCCM report for installed software, altered by Orchestrator

Although this report might not be useful to everyone, the method of altering the data within the report might be of use. 
The report essentially provides a list of all systems that have certain software installed, and presents the CPU and Operating System information for each. 
The software titles to include in the report are retrieved from a separate database which can be edited by end-users with Orchestrator runbooks.

(Removed server/domain data)

The Report


The recipients of the report wanted to retrieve a list of systems based on a predefined software list (Microsoft SQL Server, Symantec NetBackup Client etc etc). I was keen not to hard code this list of software into the report query because A: there were nearly 100 software titles to report on, which would look pretty messy in the query, and B: Software titles needed to be added and removed easily.
I created a couple of data tables on a separate database (CM_Runtime) to hold the lists of software they wanted to report on, one for Windows (dbo.reportsoftware) and the other for Linux (dbo.reportapplications).

 SCCM inventory data for Linux applications is stored in  'System_ADD_REMOVE_PROGRAMS0.DisplayName00' where-as the Windows software we wanted to retrieve was in 'System_INSTALLED_SOFTWARE0.ARPDisplayName00'

The query to retrieve the system lists based on the contents of dbo.reportsoftware and dbo.reportapplications is below.

select  distinct 
SMS_R_System.Name0 AS [Server],
SMS_R_System.Resource_Domain_OR_Workgr0 AS Domain,
___System_INSTALLED_SOFTWARE0.ARPDisplayName00 AS [Application Name],
SMS_G_System_PROCESSOR.NumberOfCores00 AS [Number of Cores],
SMS_G_System_COMPUTER_SYSTEM.NumberOfProcessors00 AS [Number of Processors],
SMS_G_System_PROCESSOR.NumberOfLogicalProcessors00 AS [Number of Logical CPUs],
SMS_G_System_OPERATING_SYSTEM.Caption00 AS [Operating System]
from
vSMS_R_System AS SMS_R_System 
INNER JOIN INSTALLED_SOFTWARE_DATA AS ___System_INSTALLED_SOFTWARE0 ON ___System_INSTALLED_SOFTWARE0.MachineID = SMS_R_System.ItemKey
INNER JOIN Processor_DATA AS SMS_G_System_PROCESSOR ON SMS_G_System_PROCESSOR.MachineID = SMS_R_System.ItemKey
INNER JOIN Computer_System_DATA AS SMS_G_System_COMPUTER_SYSTEM ON SMS_G_System_COMPUTER_SYSTEM.MachineID = SMS_R_System.ItemKey
INNER JOIN Operating_System_DATA AS SMS_G_System_OPERATING_SYSTEM ON SMS_G_System_OPERATING_SYSTEM.MachineID = SMS_R_System.ItemKey
INNER JOIN _RES_COLL_SMSDM003 AS SMS_CM_RES_COLL_SMSDM003 ON SMS_CM_RES_COLL_SMSDM003.MachineID = SMS_R_System.ItemKey
where
___System_INSTALLED_SOFTWARE0.ARPDisplayName00 in 
( SELECT InstalledSoftware
  FROM CM_RunTime.dbo.reportsoftware )

  UNION
  
  select  distinct
  SMS_R_System.Name0 AS [Server],
  SMS_R_System.Resource_Domain_OR_Workgr0 AS Domain,
  __System_ADD_REMOVE_PROGRAMS0.DisplayName00 AS [Application Name],
  SMS_G_System_PROCESSOR.NumberOfCores00 AS [Number of Cores],
  SMS_G_System_COMPUTER_SYSTEM.NumberOfProcessors00 AS [Number of Processors],
  SMS_G_System_PROCESSOR.NumberOfLogicalProcessors00 AS [Number of Logical CPUs],
  SMS_G_System_OPERATING_SYSTEM.Caption00  AS [Operating System]
  from
  vSMS_R_System AS SMS_R_System
  INNER JOIN Add_Remove_Programs_DATA AS __System_ADD_REMOVE_PROGRAMS0 ON __System_ADD_REMOVE_PROGRAMS0.MachineID = SMS_R_System.ItemKey
  INNER JOIN Processor_DATA AS SMS_G_System_PROCESSOR ON SMS_G_System_PROCESSOR.MachineID = SMS_R_System.ItemKey
  INNER JOIN Computer_System_DATA AS SMS_G_System_COMPUTER_SYSTEM ON SMS_G_System_COMPUTER_SYSTEM.MachineID = SMS_R_System.ItemKey
  INNER JOIN Operating_System_DATA AS SMS_G_System_OPERATING_SYSTEM ON SMS_G_System_OPERATING_SYSTEM.MachineID = SMS_R_System.ItemKey
  where __System_ADD_REMOVE_PROGRAMS0.DisplayName00
in 
( SELECT InstalledApplications
  FROM CM_RunTime.dbo.reportapplications )

Adding and Removing Software in Report

I made an initial bulk import of software to the data tables using PowerShell, but for ongoing management I've configured Orchestrator to remove or add rows to the tables using a couple of runbooks:


 (Remove Software title)
(Add Software title)

Each runbook initialize data properties are as follows:


To add a software title the 'Write to Database' activity is used.

To remove a software title the 'Query Database' activity is used.


A list of the current software titles held in the data tables is sent each time the tables are edited using a PowerShell script to retrieve the data and create a CSV, and then it's emailed.

# Set script parameters from runbook data bus and Orchestrator global variables
# Define any inputs here and then add to the $argsArray and script block parameters below 

$ReportPath = "D:\SCORCH Data\SoftwareReports\softwarereport-$(Get-Date -Format yyyyMMddHHmmss).csv"
$Username = "#SQLUSER#"
$Password = "#PASSWORD#"
$Database = "CM_Runtime"
$SQLServer = "#SQLSERVERNAME#"


#-----------------------------------------------------------------------

## Initialize result and trace variables
# $ResultStatus provides basic success/failed indicator
# $ErrorMessage captures any error text generated by script
# $Trace is used to record a running log of actions
$ResultStatus = ""
$ErrorMessage = ""
$Trace = (Get-Date).ToString() + "`t" + "Runbook activity script started" + " `r`n"
       
# Create argument array for passing data bus inputs to the external script session
$argsArray = @()
$argsArray += $ReportPath
$argsArray += $Username
$argsArray += $Password
$argsArray += $Database
$argsArray += $SQLServer

# Establish an external session (to localhost) to ensure 64bit PowerShell runtime using the latest version of PowerShell installed on the runbook server
# Use this session to perform all work to ensure latest PowerShell features and behavior available
$Session = New-PSSession -ComputerName localhost

# Invoke-Command used to start the script in the external session. Variables returned by script are then stored in the $ReturnArray variable
$ReturnArray = Invoke-Command -Session $Session -Argumentlist $argsArray -ScriptBlock {
    # Define a parameter to accept each data bus input value. Recommend matching names of parameters and data bus input variables above
    Param(
        [ValidateNotNullOrEmpty()]
        [string]$ReportPath,

        [ValidateNotNullOrEmpty()]
        [string]$Username,

        [ValidateNotNullOrEmpty()]
        [string]$Password,

        [ValidateNotNullOrEmpty()]
        [string]$Database,

        [ValidateNotNullOrEmpty()]
        [string]$SQLServer
    )

    # Define function to add entry to trace log variable
    function AppendLog ([string]$Message)
    {
        $script:CurrentAction = $Message
        $script:TraceLog += ((Get-Date).ToString() + "`t" + $Message + " `r`n")
    }

    # Set external session trace and status variables to defaults
    $ResultStatus = ""
    $ErrorMessage = ""
    $script:CurrentAction = ""
    $script:TraceLog = ""

    try 
    {
        # Add startup details to trace log
        AppendLog "Script now executing in external PowerShell version [$($PSVersionTable.PSVersion.ToString())] session in a [$([IntPtr]::Size * 8)] bit process"
        AppendLog "Running as user [$([Environment]::UserDomainName)\$([Environment]::UserName)] on host [$($env:COMPUTERNAME)]"
        AppendLog "Parameter values received:ReportPath=[$ReportPath] Database=[$Database] SQLServer=[$SQLServer]"

           # The actual work the script does goes here
        AppendLog "SQL Query to retrieve"
        $Array = @(Invoke-SQLCmd -query "SELECT InstalledApplications AS [Software] FROM dbo.reportapplications UNION SELECT InstalledSoftware AS [Software] FROM dbo.reportsoftware" -Server  $SQLServer -Username $Username -Password $Password -Database $Database)


        AppendLog "Writing to CSV File"  
        $Array | ConvertTo-Csv -NoTypeInformation | 
        % {$_.Replace('"','')} | 
        Out-File $ReportPath -Encoding ascii


        # Validate results and set return status
        AppendLog "Finished work, determining result"
        $EverythingWorked = $true
        if($EverythingWorked -eq $true)
        {
           $ResultStatus = "Success"
        }
        else
        {
            $ResultStatus = "Failed"
        }
    }
    catch
    {
        # Catch any errors thrown above here, setting the result status and recording the error message to return to the activity for data bus publishing
        $ResultStatus = "Failed"
        $ErrorMessage = $error[0].Exception.Message
        AppendLog "Exception caught during action [$script:CurrentAction]: $ErrorMessage"
    }
    finally
    {
        # Always do whatever is in the finally block. In this case, adding some additional detail about the outcome to the trace log for return
        if($ErrorMessage.Length -gt 0)
        {
            AppendLog "Exiting external session with result [$ResultStatus] and error message [$ErrorMessage]"
        }
        else
        {
            AppendLog "Exiting external session with result [$ResultStatus]"
        }
        
    }

    # Return an array of the results. Additional variables like "myCustomVariable" can be returned by adding them onto the array
    $resultArray = @()
    $resultArray += $ResultStatus
    $resultArray += $ErrorMessage
    $resultArray += $script:TraceLog
    $resultArray += $myCustomVariable
    return  $resultArray  
     
}#End Invoke-Command

# Get the values returned from script session for publishing to data bus
$ResultStatus = $ReturnArray[0]
$ErrorMessage = $ReturnArray[1]
$Trace += $ReturnArray[2]
$MyCustomVariable = $ReturnArray[3]

# Record end of activity script process
$Trace += (Get-Date).ToString() + "`t" + "Script finished" + " `r`n"

# Close the external session
Remove-PSSession $Session


Check the Status of ConfigMgr MP Replica's with Orchestrator

I recently identified the need to receive an alert when one of the SCCM Management Point SQL replicas became un-healthy. (e.g. replication with subscriber fails).

A simple SQL query can be run on the CMDistribution database to bring back the status of the Replication Agents. Using this information an email alert can be triggered using Orchestrator.
I've scheduled the parent runbook to execute once a day using a Windows scheduled task and SCOJobrunner.exe.

The resulting email will look something like this (if you have 4 SCCM MP's):


Overview

 (Parent runbook)
(Child Runbook)


Runbook Activity's

The first step invokes the child runbook, this is done so that the data retrieved using the SQL query is flattened to prevent sending an email per MPReplica.

  • Run SQL query to retrieve the status of each MPReplica from CMDistribution DB. Status values are as follows:
  1. Started
  2. Succeeded
  3. In Progress
  4. Idle
  5. Retrying
  6. Failed


SELECT status AS ReplicationAgentsStatus 
FROM dbo.MSReplication_monitordata
WHERE publication = 'ConfigMgr_MPReplica'


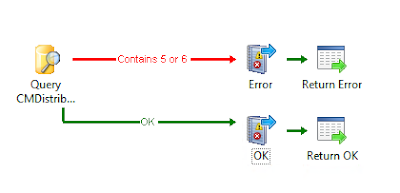
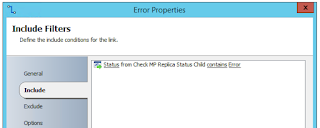
  • We only need to alert when the status = 5 or 6. So the links from the SQL query will split based on this.

(Go to 'Error' when SQL string contains 5 or 6)

(Go to "OK" when SQL string contains 1,2,3 or 4)


  • In order to create a Returned Data value and generate some events (just in case SCOM needed to collect the status in the future) I used 'Send Event Log Message' activity's.

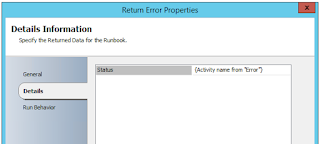
  • The 'Return Data' activity's include the activity name from either 'Send Event Log Message'

(Return Activity Name from 'OK')
(Return Activity Name from 'Error")

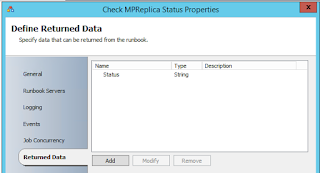
(Parent runbook Returned Data from child runbook)


  • Using the flattened return data, determine whether to send an email alert or not. If there are 4 SCCM MPReplica's with no issues the data will look like: "OK,OK,OK,OK". If there was an issue with one of the servers it would look like: "OK,Error,OK,OK". The links to the subsequent activity look like this:


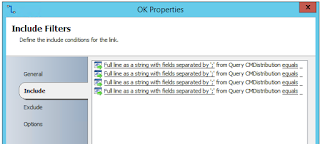
 (Go to 'Send Email' if returned data contains the word 'Error')


(Go to OK if returned data doesn't contain 'Error')


  • If there is an error, use PowerShell script to generate an email with the current status of MPReplica's in HTML format. This PS script uses the SCORCH best practice template (More info) because PS v.2 doesn't support the SQL functions needed.
The SQL and SMTP details are stored as Orchestrator variables which are called in the PS script.


$Username = "\`d.T.~Vb/{9995A45F-87F0-40B9-8D7A-AA113E4EB251}\`d.T.~Vb/"
$Password = "\`d.T.~Vb/{AC9E30A6-7F4F-4E2E-BA15-82ECE7D58301}\`d.T.~Vb/"
$Database = "CMDistribution"
$SQLServer = "\`d.T.~Vb/{68A5FAA6-AFEC-4DE0-A40F-D06DEB80BCA6}\`d.T.~Vb/"
$FROM="\`d.T.~Vb/{E755220C-D529-46B9-B72E-D105CE15C5BC}\`d.T.~Vb/"
$SMTP = "\`d.T.~Vb/{806E12A2-90B9-41BE-9F2F-7E32BAEF57B0}\`d.T.~Vb/"
$smtpUsername = "TFL\\`d.T.~Vb/{3E209AB6-5BE8-4D67-AB26-6A797DC68F91}\`d.T.~Vb/"
$smtpPassword = "\`d.T.~Vb/{A2168CE3-4E2A-404B-9A1B-2D245165A526}\`d.T.~Vb/"


#-----------------------------------------------------------------------

## Initialize result and trace variables
# $ResultStatus provides basic success/failed indicator
# $ErrorMessage captures any error text generated by script
# $Trace is used to record a running log of actions
$ResultStatus = ""
$ErrorMessage = ""
$Trace = (Get-Date).ToString() + "`t" + "Runbook activity script started" + " `r`n"
       
# Create argument array for passing data bus inputs to the external script session
$argsArray = @()
$argsArray += $Username
$argsArray += $Password
$argsArray += $Database
$argsArray += $SQLServer
$argsArray += $FROM
$argsArray += $SMTP
$argsArray += $smtpUsername
$argsArray += $smtpPassword


# Establish an external session (to localhost) to ensure 64bit PowerShell runtime using the latest version of PowerShell installed on the runbook server
# Use this session to perform all work to ensure latest PowerShell features and behavior available
$Session = New-PSSession -ComputerName localhost

# Invoke-Command used to start the script in the external session. Variables returned by script are then stored in the $ReturnArray variable
$ReturnArray = Invoke-Command -Session $Session -Argumentlist $argsArray -ScriptBlock {
    # Define a parameter to accept each data bus input value. Recommend matching names of parameters and data bus input variables above
    Param(
        [ValidateNotNullOrEmpty()]
        [string]$Username,

        [ValidateNotNullOrEmpty()]
        [string]$Password,

        [ValidateNotNullOrEmpty()]
        [string]$Database,

        [ValidateNotNullOrEmpty()]
        [string]$SQLServer,

        [ValidateNotNullOrEmpty()]
        [string]$FROM,

        [ValidateNotNullOrEmpty()]
        [string]$SMTP,

        [ValidateNotNullOrEmpty()]
        [string]$smtpUsername,

        [ValidateNotNullOrEmpty()]
        [string]$smtpPassword
    )

    # Define function to add entry to trace log variable
    function AppendLog ([string]$Message)
    {
        $script:CurrentAction = $Message
        $script:TraceLog += ((Get-Date).ToString() + "`t" + $Message + " `r`n")
    }

    # Set external session trace and status variables to defaults
    $ResultStatus = ""
    $ErrorMessage = ""
    $script:CurrentAction = ""
    $script:TraceLog = ""

    try 
    {
        # Add startup details to trace log
        AppendLog "Script now executing in external PowerShell version [$($PSVersionTable.PSVersion.ToString())] session in a [$([IntPtr]::Size * 8)] bit process"
        AppendLog "Running as user [$([Environment]::UserDomainName)\$([Environment]::UserName)] on host [$($env:COMPUTERNAME)]"
        AppendLog "Parameter values received:Username=[$Username] Database=[$Database] SQLServer=[$SQLServer] FROM=[$FROM] SMTP=[$SMTP] smtpUsername=[$smtpUsername]"

           # The actual work the script does goes here
        AppendLog "SQL Query to retrieve accounts"

$pass = ConvertTo-SecureString -AsPlainText $smtpPassword -Force       
$Cred = New-Object System.Management.Automation.PSCredential -ArgumentList $smtpUsername,$pass

$Array = @(Invoke-SQLCmd -query "SELECT agent_name,status,lastrefresh,last_distsync,time_stamp,cur_latency FROM dbo.MSReplication_monitordata WHERE publication = 'ConfigMgr_MPReplica'" -Server  $SQLServer -Username $Username -Password $Password -Database $Database) | ConvertTo-Html -Fragment

# Build and send email for each contact.
        AppendLog "Build and send email"


# Config at top of script
# Param for sending mail 

$smtpsettings = @{
    To = "\`d.T.~Vb/{57C5F4D7-D2FA-46E5-8D10-A31FACFE16EB}\`d.T.~Vb/"
    From = $From
    SmtpServer = $SMTP
    Subject = "ConfigMgr MPReplica Status Error"
    Port = "587"
    Credential = $cred
}

$date = (Get-Date).AddDays(-60)
$htmlhead = "<html>
                <style>
                BODY{font-family: Calibri; font-size: 11pt;}
                H1{font-size: 22px; font-family: 'Segoe UI Light','Segoe UI','Lucida Grande',Verdana,Arial,Helvetica,sans-serif;}
                H2{font-size: 18px; font-family: 'Segoe UI Light','Segoe UI','Lucida Grande',Verdana,Arial,Helvetica,sans-serif;}
                H3{font-size: 16px; font-family: 'Segoe UI Light','Segoe UI','Lucida Grande',Verdana,Arial,Helvetica,sans-serif;}
                TABLE{border: 1px solid black; border-collapse: collapse; font-size: 8pt;}
                TH{border: 1px solid #969595; background: #dddddd; padding: 5px; color: #000000;}
                TD{border: 1px solid #969595; padding: 5px; }
                td.pass{background: #B7EB83;}
                td.warn{background: #FFF275;}
                td.fail{background: #FF2626; color: #ffffff;}
                td.info{background: #85D4FF;}
                </style>
                <body>
                <p>Hello<br>There is an issue with replication on the SCCM MP Replica's. Please see below for more information.<br><br>
                Yours Faithfully,<br>
                Orchestrator</p>"

$htmltail = "</body></html>"


$body = $htmlhead + $array + $htmltail

Send-MailMessage @smtpsettings -body $body -BodyAsHtml


        # Validate results and set return status
        AppendLog "Finished work, determining result"
        $EverythingWorked = $true
        if($EverythingWorked -eq $true)
        {
           $ResultStatus = "Success"
        }
        else
        {
            $ResultStatus = "Failed"
        }
    }
    catch
    {
        # Catch any errors thrown above here, setting the result status and recording the error message to return to the activity for data bus publishing
        $ResultStatus = "Failed"
        $ErrorMessage = $error[0].Exception.Message
        AppendLog "Exception caught during action [$script:CurrentAction]: $ErrorMessage"
    }
    finally
    {
        # Always do whatever is in the finally block. In this case, adding some additional detail about the outcome to the trace log for return
        if($ErrorMessage.Length -gt 0)
        {
            AppendLog "Exiting external session with result [$ResultStatus] and error message [$ErrorMessage]"
        }
        else
        {
            AppendLog "Exiting external session with result [$ResultStatus]"
        }
        
    }

    # Return an array of the results. Additional variables like "myCustomVariable" can be returned by adding them onto the array
    $resultArray = @()
    $resultArray += $ResultStatus
    $resultArray += $ErrorMessage
    $resultArray += $script:TraceLog
    $resultArray += $myCustomVariable
    return  $resultArray  
     
}#End Invoke-Command

# Get the values returned from script session for publishing to data bus
$ResultStatus = $ReturnArray[0]
$ErrorMessage = $ReturnArray[1]
$Trace += $ReturnArray[2]
$MyCustomVariable = $ReturnArray[3]

# Record end of activity script process
$Trace += (Get-Date).ToString() + "`t" + "Script finished" + " `r`n"

# Close the external session
Remove-PSSession $Session


About Me

My photo
Senior Consultant at CDW UK specialising in Microsoft workspace and cloud technologies.